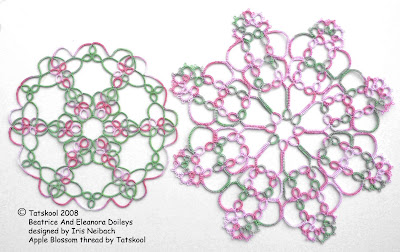
The next one I chose was Eleanora because that looked easy too. Well I was wrong it wasn't easy at all!!
My trial in Flora 20 was a masterpiece of untatting! I had printed a pale copy of the photo and coloured it in but even when I had completed it I was not too sure how I had actually done it.
Inattention to the diagram in the book caused my first mistake, tatting the chain past Ring 3 which is thrown off it...untat back a lot...wont do that again.
Then there were several places where I would finish a chain, tat the next ring and the realise that I was going in the wrong direction for the next chain to be made. Untat again and use the other shuttle for the ring and I was fine.
For my second attempt I realised that it would be a good idea to colour my diagram according to which shuttle I was using and after that it was a doddle!!
I asked Iris if I could show you my diagram and she was happy with that, so here it is.

The rings are numbered consequitively so you can follow the flow easily. You can see where to change shuttles, the red parts are made using Shuttle 1 as the working shuttle and the green parts use Shuttle 2 as the working shuttle.
This is not the way I would normally colour a diagram...proof of this is that I made the mistake of telling you that it was like this on the diagram that I made for the Christmas motif in my last post. Not so..that was the colour that the rings and chains would look like in the finished item...I have corrected this.
Well I fooled myself too as for my next attempt I decided to use Apple Blossom 40 and a co-ordinating green and imagined it looking like my diagram with a green outer edge.
Silly, silly me!!!
It actually looks like this...

I am not used to tatting in anything other than 20 so it looked TINY!

Colour balance difficult to get right on that photo and they wont both fit on the scanner.
Second thing to strike me was how different the Apple Blossom looked. I designed it to be mostly pinks with just a hint of green leaves and now suddenly it was mainly green.

Wow! just shows the different ways to use HDT's.


Have you borrowed Harry Potter's house elves? That's the only way I can imagine you getting so many doilies tatted! They are beautiful. I, too, find it interesting how different the HDT works between rounds and center to point.
ReplyDeletePamela,
ReplyDeleteI love the way you brought that Christmas snowflake to life a few posts ago and thank you so much for showing all the different variations you tatted it in, as well as how it looks on different backgrounds. I like the way you've compared this doily too, with the different color combinations and showing the difference in size because of using a different size thread!
I wish I had more time to experiment but in the meantime, I'll just keep tabs on what YOU are doing! LOL!
:-) Gina
I was wondering the same thing as Tzttycat! How on earth do you get SO many doilies done? You must have maids or someone to do your housework and a chef to cook for you and get very bored at your job so you tat, yeah, that's it!!!
ReplyDeleteWell, thank you for being a good sport while I teased you. Your post is lovely. The doilies are vey beautiful!
Thanks Gina for the encouragement to shotw too many photos.
ReplyDeleteTatyCat and TattingChic Oh my goodness! I never thought that you would guess my secret about my house elf!!! Oh well elf's out of the bag now so I will just have to tat more doilies even faster!!!
Yes the effect on the doilies of rounds versus into centre and back is very different and very clever.
It has me hooked!