Search this Blog for anything you thought you might have seen here.

Monday, September 03, 2007

Hearts and more Hearts

What should fall onto my doormat today but my copy of Martha Ess's new book Tat's Amore. If you haven't already heard about it do check out this link. I promise that you wont be disappointed, it's a cracker of a book.


When Martha asked me a couple of months ago if I would like to be a test tatter for her new book to say that I was pleased would be the understatement of the year. As someone who never inherited any designer genes! I WAS DELIGHTED.

Offered a tempting, mouth watering choice of designs the problem was which to pick as they are all lovely but my eye went straight to the Crewel Heart that I had seen on her website some while ago. I had thought it gorgeous then but the lattice centre looked as if it would be somewhat difficult to get looking even. But I love a challenge so that was the one for me.

Martha's choice of colours of blue and silver was exactly what I would have picked so I had to do something different and leapt in with a central lattice of a fawny coloured Flora 20 and loved the result which looks like hessian. Was it diffficult...well after a bit of practice it was easy to get the spaces between the little rings relatively even. I am a Virgo and just read that Virgo's motto should be "Perfect is almost good enough!!" Mmmm I think that fits me allright!!
Do have a go at this one because the result is well worth it. Burgundy on one side looked lovely but what to choose for the other more side was a problem. One of the attractions of this heart was a sort of ying/yang feel to the two sides of masculine /femininess. But a certain orange thread kept shouting at me 'Pick me, I will make it zing! and I am a complimentary colour after all!! And so here it is.


Mmmmm couldn't resist trying a silver lattice centre next and it looks stunning, used Coats Ophir for this, together with a candy pink Flora 20 and a variegated Altin Basak 50.


Each large heart has one or two smaller accompanying ones and here they are with a silver centre. they also look lovely with a variegated thread for the lattice.
Lots and lots of things to try I was soon addicted and hope that they will appear soon on one of my Treasures from Trash denim bags


This little bag is being made from an itty bitty denim skirt that fitted a two year old, one of my many, many, many charity shop finds. The fabric behind will be used for the lining, a cut down elasticated belt and mmm those pockets are just crying out for little hearts.


Just when I thought it was safe to get back to tatting animals for my challenge, Martha tempted me further with another heart to test.

I thought that the Crewel Heart was my favorite 'till I tried this little beauty, this Flower Bouquet Heart captured mine.
Another one of my favorite fiddly pieces I am sure you will agree that the result was stunning.


I am now making this one again in brighter colours to show up against denim and going to add some beads for sparkle.

The little heart to go with this one is lovely too.


It looks so sparkly with beads that now there is competition to see which hearts go on the denim bag.


Thanks Martha for your lovely book, the pleasure has been all mine....and lots more hearts still to make.

Monday, August 27, 2007

Number 11. Seahorses

Haven't blogged for a while, been busy test tatting hearts for Martha Ess's new book...more about that later.
Next in line for the challenge treatment is the seahorse, such a classic and lovable creature that he just has to be tatted.

In life they are generally very understated colourwise, creamey, greeney, browney, they blend in with their environment and are hard to spot.
Shapewise it's hard to believe they are real and not just a product of someone's vivid imagination.

First up was Jane Eborall's pattern for Seahorse earrings. I never did get to make a pair just explored the pattern starting with a trial run in white (often do that just to see how much thread they take). Next tried out Flora 10 then Flora 20 and finally a few colour variations with beads in Flora 20 and Altin Basak/Oren Bayen 50. These are about 1.5inches, 4cm tall.


Methinks the orange fella has too many stitches on his head but he is rather cute.


Moving on to bigger seahorse and Jane's medium seahorse pattern
. This pattern was a treat to do, easy and cute. So easy to get carried away and try every thread and bead in my stash. He comes in two versions with his fin being either rings or long picots. Hard to say which I like best, think maybe the long picots...an interesting technique.


Beaded and non beaded versions using Flora 20 measure 3inches, 7.5cm.


Here are the two fin variations. I did come up with a tiny variation on the looped picot one that lifted the snout and gave him a more smiley face. Love these colours and this one too.


Bigger again was Debbie Arnold's pattern very elegant and realistic he took me a couple of goes to get right and even then I still made a mistake in his head. For all those comments as to if I ever make mistakes the answer is yes, very often. The first one of every pattern is a trial attempt, I usually get it right second time around.


First attempt was the green one in Oren Bayen 50. I had major problems getting the number of repeats right and joining to the right ring so he came out with a much longer snout and a shorter tail but on the basis that there is no such thing as a mistake only a new pattern he looks rather good. Debbie's pattern is excellent but for me it was much easier when I enlarged the drawing and numbered each ring on the drawing and pattern. Even then I still made a mistake on the head and joined to the wrong ring in one place. Thanks Debbie for a great pattern. I added an eye with a bead inside a ring.
The yellow one uses a thread I just got recently for the lovely animal earthy colour that it comes in. It is Coats Madura Red heart.. made in India. A thread labelled 20 but I think is more like a 15 and has a lot of twist in it. The seahorse worked out at 5.5inches 14cm.

Finally the largest seahorse that I found is another Jane Eborall pattern and is the most detailed and tricky one. Unlike the patterns Jane has designed recently this one is not made in one pass but has five separate section to be worked building up the animal. Lots of ends to hide some of which I ended up with tie, glue and cut and I just couldn't hide them but you'd never notice!!


He was fiddly and took a while to make but he was well worth the effort. I am sure it must be a male with a pouch full of babies ready to explode into the world!!
made in Oren Bayen 50 and Rainbow Ruby beads I love this colour combination. He measures almost 6 inches, 15cm.

Finally here is a collage of seahorses to give you an idea of the relative sizes. Debbie's would be much smaller in a similar size thread.

Saturday, June 30, 2007

Number 10. Gecko!!!

My very favorite animal the gecko,(you didn't know that did you!!!).
After gentle hints, lots of inspiring photos Jane finally got bitten by the gecko bug and designed the most fabulous pattern for me. If you haven't seen all her geckos on her blog then you have missed a treat, and her gecko trimmed jacket is a real wow.
Tatting and geckos rule!!
I couldn't wait to give the pattern a test run and here is my first attempt.


He's OK apart from his eyes which ended up on the wrong shuttle!

Jane's geckos come in the most outrageous colour mixes that are beyond the wildest dreams of even the most fashion conscious gecko!! I guess my conservative choices will blossom into similar geckos.

BUT the remit of this challenge is to try to make realistic animals and so this was the aim in my second gecko.

My very own gecko expert said that Jane's gecko reminded him in it's shape of one of his New Caledonian geckos Rhacodactylus auriculatus commonly known as the Gargoyle gecko. Look particularly the shape of the tail,in the first photo, the base of the tail is bulbous and they continues as a short narrow tail. Also the relatively large head.

This was one of my favorite geckos, he had her for 16 years and she was not a youngster when he got her. Sadly she died about six months ago. You can't really see her true shape from these pictures, she did put on a bit of weight in her old age!


A nocturnal tree living gecko you can see how she would blend in with the bark.
She was always a favorite with visitors as she was slow to run away. Her skin was soft as velvet and so were her little paw pads. See how she can bend her toes upwards, the only vertebrate to be able to do that. This protects the 'sticky' micro hairs from getting dust and dirt in them.

So this is my tribute to her. Restrained by the colours of my threads she is a new variety R.auriculatus var.'Jane's Gargoyle'!


The thread is Coats Anchor perle 8 (from Coats India)and it really shines, the beads orange and silver lined brown, sparkle. She measures five and a half inches and if there is anybody out there like me who likes to know how much thread to use, she took 6.25m on sh1 and 4.5m on sh2 (I tat very tightly so you may need more). They have white eyes with a vertical slit like pupil which they can close as they have no eyelids. I used brown wooden ones about 5mm. may try some pale ones next.

I did tweak Jane's pattern just a little to give her a longer stride and a front left elbow. She is a very young and agile gecko!
She has a very tatty tail (looks like she may have been attacked by a bird!!) due to my inability to master Tonya's method of adding beads to a split ring, got it in the end tho but slightly differently. Lots more mistakes in there too.
The pattern is very easy to follow, done in one pass and when finished doesn't need blocking just a little flattening. When you do the feet (long picots) make sure the thread isn't twisted and they will lie perfectly round. I used 20mm picots.

Lots more geckos to come! Did you see my gecko memorabilia on my other blog.

Tuesday, June 19, 2007

Number 9. Scorpions!

I HATE SCORPIONS!!!!!!!!!

So why would I want to include one in the progression of my tatted challenge zoo!

Well, after I'd tatted the Meerkats I watched a programme on Meerkats (fleas and all!) in the Kalahari Desert. What wonderful social groups they live in, taking it in turns to be the 'look out', always ready for the unexpected.
Saw them grooming each other like the primates do, guess this is their way of dealing with those darn fleas!
There is not a lot to eat in the desert and one of their favourite snacks is a nice crunchy scorpion. Makes me shudder! Apparently they are more or less immune to the stings.

Still not a good enough reason to tat a scorpion?

So on to my story.
In 1967 when we were just married (yup celebrating 40 years next week) we took our belated honeymoon on an expedition to a Greek island with our University. Mmmm not much of a honeymoon sleeping in a tent for a month in a sun scorched field in the August heat. But we did have such great adventures travelling there and back thanks to the sponsors, riding on The Orient Express route from Paris to Venice, time in Venice, cruising thro' the Corinth Canal and down the Aegean sea on a small cruise liner to Pyraeus, time to spend in Athens, oooh what memories.

OK I'll cut to the point ...the scorpion!

My job on the expedition was to collect and identify the insects on the island so I'm not unduly squimish about anything with 6 legs. But when it comes to creepy crawlies with 8 legs that's a whole new ball game. One morning as I crawled out of my sleeping bag I felt that something had landed on my hair I instinctively brushed it away, bad move... it was you guessed, it a scorpion and it stung me on the side of my head...OUCH!
Now the only thing I knew about scorpions was that their sting was fatal! So it was lucky that I was on a zoological expedition and had people around (especially new hubby who knows these things!) to assure me that they were in fact not all lethal. I work on the basis that if someone tells me NOW YOU CAN PANIC then that's the time to panic! that's the theory anyway.
Well it wasn't fatal and it paid for that sting and was preserved for posterity!! I blurred it's details on our expedition label to save it's face but I was so amused to read the little addendum on the end of it 'after stinging the latter of us' !!!!!

Here he is with a little mate who didn't get the chance to sting me!


Being stung by one scorpion is an unfortunate accident but be stung by two scorpions is darn right bad luck!

A little more than a year later we went to live in Dar Es Salaam, Tanzania, and work at the University. The first apartment we were given was on the ground floor and it didn't take long to realise that such freedom of access to all things that creep, crawl and slither! was not good. In less than a week I had trodden on a scorpion hiding in the dark in my shoe, can't blame the poor little beggar for lashing out. Fortunately he wasn't lethal either but boy it hurt like hell, ever had dozens of red hot needles stuck into the sole of your foot so that every time your foot touched the floor they shot up your leg. Don't remember much about the pain from the Greek scorpion, it must have hurt but I well remember hopping about on a make shift crutch for days after this one.
Needless to say we applied for a new apartment on got one on the first floor where we lived happily and safely for two years.

So lets say that tatting a scorpion is like laying a ghost for me and for once I can look at a friendly very cute scorpion courtesy of Jane's pattern.

Just a little tweaking honest to make him look more like my scorpion.

This is Jane's original pattern, very cute and instantly recognisable as a scorpion to me, but just not quite right.


Perhaps I better explain a bit about Scorpion anatomy,(those who are bored cut to the end!!).
You all know that insects have 6 legs and spiders have 8, this little fellows legs have been missed out as not necessary for the scorpion effect. But they would have been seen coming from the segments of the cephalothorax. Too big a word, nah...insect body is divided into 3 parts,head,thorax and abdomen but in arachinds the head and thorax are fused into one (hence cephalothorax) so they only have that and the abdomen. So far so good but I can hear you saying if the 8 legs are not on this specimen what on earth are those leg like things with the big claws.
Well unlike us insects and arachnids don't have teeth or hands to manipulate food instead they have mouthparts..extra little 'arms' to help them pick up, hold and stuff food into their mouths!! and serrated 'teeth like bits' to help them 'chew'.
So those long 'arms' are modifield mouth parts. While used to pick up food their are also very useful in attack and defense and are called pedipalps.

Now you know that my aim was to tat realistic animals so with `Jane's permission I tweaked.

The pedipalps on Jane's scorpion are too curved and have too many segments. Scorpions hold their claws out to the side of their body ready for action, so Jane's curve had to be reversed and an elbow made.
I loved the eyes and the way she had shown the segments of the cephalothorax with the loops of chains but I couldn't get them to lie flat so had to tweak a bit.
the abdomen I felt was too short for my scorpion and is immediately narrow as it emerges from the cepho' so that was tweaked too.
here are some shots of my trials and errors.
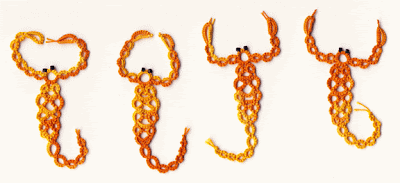


Finally I found that if I tatted the rings of the abdomen as for wrong side..2nd half, 1st half then it would curl up holding the sting in the tail above the body, and this I am happy with. Thanks Jane I could never have made this on my own.


He wouldn't hurt a fly, honest!
He's made in Oren Bayen thread in gorgeous varig oranges, looks so desserty, and measures about and inch and a half.

What happened to the African scorpion did someone ask.....well he paid the ultimate price too, I just can't find him at the moment, just remember him as being very black and sinister!

Saturday, June 16, 2007

Taking a doily break!

I have been taking a break from tatting animals and have been tatting doilies. I haven't tatted a doily since the 80's when they were always done in white and had become boring!! and big!! I rarely do big!

But I had challenged my friends to make something bigger than they had ever made before, and I was going to be working all day for a month invigilating University exams so needed something to auto tat between exams.

I was so pleased to make a new young tatter during that time and to finish not one but three doilies.

The pattern is Emily from Janet Carroll's book 'Elegant Tatting Patterns'.
Tatted in Size 20 Coates Anchor and Flora threads the doilies measure about 8 inches.
First one was the trial one in white, I still love white doilies they have a crispness hard to get any other way.


I was not very happy with the outer round with josephine knots, need to pull the chain much tighter for it to lie well.

Second doily came out really well and was the favorite of many people I showed them to.


The third one is I think my favorite as it so different from anything I have done before, and I am happy with the tension.

Sunday, May 13, 2007

Number 8. A buzz of Bumble Bees

Well all that hopping up and down by the Meerkats with the fleas attracted a buzz of Bumble Bees and pretty angry they looked.


But the Meerkats calmed down as soon as they spotted the bees, obviously had come across bees before!! and no harm came to them.

The pattern is Martha Ess's Itty Bitty Bumble Bee from her New Critters On The Block book.

The Bumble bees were tatted in Flora 10 and in 20 for the little one and the wings are made with Coates Ophir in light gold. the big one measures about 1.5 inches from the sting in his tail to tip of his antennae and the smaller one is 1 inch long.

Sunday, May 06, 2007

Number 7. Fleas!!

Well it had to happen!!
Just come back from a holiday in England and what do I find on my return but the Meerkat family hopping up and down and scratching themselves silly!!!

On close examination they have got fleas!
It was a devil of a job to catch them but I managed to pin down a couple for closer inspection.


Well it turns out that they are a new species of flea Pulex eboralli going by the common name of Freddie the Fantastic Flea. hmmm I'll give her fantastic!!

I do remember Jane and Sue went to Palmettos one year loaded with the little beggars and soon had spread them to all the tatters who were highly amused.

That's all very well, but when you are tatting a wildlife park the last thing you want is an internet infestation of fleas. Be warned all you animal tatters if you click on the above link these tiny little critters are worse than internet viruses.

Has anybody tatted anything that eats fleas??????? I have a few ideas but any help would be welcome.

Monday, April 16, 2007

Number 6. A Gaggle of Geese

First up once again was one of Martha Ess's block tatted critters. Her goose is just fabulous and I soon had a gaggle running around as fast as their little legs could carry them.
After much deliberation I coloured the beaks with a felt pen and liked the effect a lot.
The goose and gander...do they look different I wonder are made in Flora 10 and measure 2.75 inches and have metallic green eyes about size 9. The goslings who probably shoud have been fluffy lemon with black beaks are in Flora 20 and measure 1.75 inches and have blue iris eyes size 10. I did try them in Coates Anchor sizes 30 and 40 but they have yet to get their legs.


One interesting thing in this photo is can you see the difference between the bodies of the leading gander and all the others. For that goose I tried Jane's (and others) method of block tatting. Very easy to do using one shuttle and ball in this case gives a more rounded effect to the body. This is a particularly nice effect in these animals. Click on the photo for an enlarged version.

Next in line was Jane Eborall's goose, yet another brilliant pattern. Made in four sections wing,rest of body and neck, legs and beak, it is easy to tat providing you can do split rings, SCMR and make rings off SR's. I tried to make them a little different from each other by making the gander with a larger green metallic eye and a thicker beak. I liked the way she made the wing section in ecru to give it definition. The shape of the head and the beak are my favorite bits.
They are both made in Flora 20 and measure about 5 inches.


I had a fancy to make an angry goose with its mouth open and it's neck stretched out but that is for another day, the neck and head suggest lots of different postures to me.

BUT I did try out another goose, wanted to make a Greylag goose and experimented with different colours. Gave him a shorter thicker beak. He doesn't look much like I intended but I rather like him and I love the way his neck curved, so here he is a new species of goose, wonder what I should name him.


He was made on Flora 20 too in light and dark grey.

Trying another one adding a DMC 80 in variegated shades of grey to both the light and dark threads, not sure I like the effect so far in this the wing section.
Lots of potential here.

Thursday, April 12, 2007

Number 5. A Tatted Medley of Meerkats

If you haven't already seen the latest critter to come from the ever increasing design collection of Jane Eborall, then here he is 'The Meerkat'.
I am not sure that I have ever seen a Meerkat in the flesh, certainly not in the wild, but recognised him instantly such is the cleverness of Jane's design.

I didn't have a great detail of choice for the right kind of colour for him so here are a few I tried.


First attempt was the variegated one using Twilley's 20. A difficult thread to use, rather coarse and hairy, had to keep using thread heaven in the end to control it.
Was not too happy with him, colour not great and beads too big.
Second attempt was in Oren Bayen 50 a soft 3ply thread that I am not too keen on but it tatted up really well, bit too dark though.
Third attempt was in DMC Perle 8, an even softer thread that I hadn't used before and it tatted up really well.

The Meerkat is fairly easy to tat, with a bit of concentration, especially with Jane's instructions for easy block tatting. In these threads he stands a little under 5 inches tall.

Now I know I am getting very pernickety about my animals but when I put them on a display board (you may have seen my display on my other blog, if not it will appear here soon) I think that it would be really nice to have two versions of the animal so that they don't all look identical.
The two flamingos look so well together that I thought that a Meerkat looking the other way could be good. Jane said 'Go for it!' so here he is. She will put him up on her web site I think.


The other 3 Meerkats were a bit suspicious of him at first but he will soon settle in!!


And then there were four.
Now dare I ask has anybody else designed a Meerkat for me to try!!!!

Tuesday, April 03, 2007

Number 4. Penguins

Martha Ess has the cutest, irresitible Penguins in her book 'New Critters on the Block' and I couldn't resist tatting up a colony of them.


The little guys are made in size 20 Flora thread and the big ones in Size 10. Can't tell you the height of them right now as they have gone off to an exhibition. Little ones prob about an inch high.

Visited our local wildlife park Fota last week and made a beeline for the penguins (amongst other things) and this little guy sitting on a rock really took my fancy.
He really is a little fella probably not much more than 20 inches high. I think maybe he is a Humboldt Penguin from South America.


Had anybody designed a side view of a penguin.

Well the answer is yes, Pam Palmer has one in a publication from 'The Lace Guild','The Penguin Pattern Book', the book contains penguins and related items made in a variety of crafts but this tatted penguin is the star of the book to me, he is a winner. Made in 4 sections he is fairly easy to tat.

Here is a little group of them made in size 20 Flora


And a singleton in size 10, sorry again that I can't give the measurements at the moment. He is probably about 4 inches tall.


Have one other pattern to try, does anyone know of any more penguin patterns??