Search this Blog for anything you thought you might have seen here.

Friday, December 04, 2009

Fourth Day of December!

Another day, and yet another snowflake....from 24 Snowflakes in Tatting by Lene Bjorn.

The response to yesterday's snowflake in it's glorious colours was stupendeous. I will get around to answering all of the comments. Please keep them coming they are making my fingers fly! Without them I will give up...so if you are enjoying this and have never left a comment before...now is the time.

Today's snowflake....here it is.....


......bears such a striking resemblance to yesterday's that it only got tatted once!!

.....but yesterday's got tatted again to make up for it!!!


....so what do you think of this one with it's brighter than bright Rainbow Orange center...jeepers!! My fingers flew a little too fast and as I was 'refining' the stitches and picots didn't I see a glaring mistake. Oh well, nobody is perfect!!

So Day 4 is the same as my favourite but with the fluffy center replaced by simple rings and chains. I have been spoilt!

The pattern says that it is done in two rounds continuously! yeah that was ok!

Thread amounts for Day 4 using Coats Floretta 20. The flake measures 9.5cm.
Sh1 6m making smallish picots, Sh2 3.75.
Bigger picots would be nice but I find it hard to make them bigger without using a gauge! they just naturally come a certain size!!

Thursday, December 03, 2009

Third Day of December!

Another day, another snowflake....from 24 Snowflakes in Tatting by Lene Bjorn,but this time it's my absolute favourite in the book, so I tatted this lots of times and will tat it even more when I get the chance...why did I ever start this challenge!!! This is what I love to do, explore a pattern to the utmost!

I started with a varig Altin Basak to see how much thread it would take. I have quite a selection of Altin Basak/Oren Bayen varig's that I rarely use as they are soft 3 cord threads.


This was so pretty that I had to tat it again to send to a friend. It spurred her on to tat some herself!

I felt that it would look good with a different thread for the middle, rather like a flower with fluffy stamens.


These were made with Coats Floretta 20 in ivory and indigo, the first scan was with the scanner lid closed flat, and the second one with the lid propped up with pencils so that it didn't squash the fluffy center. The shadows really let you see the 3D effect.
The thing that I like best about this design is the lovely 3D center. I also bought the book of Snowflake Roses by Denise Munoz, but not a single one has a fluffy center. That's a job for next Christmas to adapt those designs.

Another one with a Floretta center in appley green with my Raspberry and Chocolate Mousse for the second round. Lovely subtle colouring.


I didn't know if I was going to like this one until I got to the very end, and I do.
It reminds me of a spring flowering Hellebore. I would like to try it using a slightly darker green for the outer round, even more Hellebor-ish.

OK!! so you have all missed Rainbow Bright (well one of you anyway!) and so have I.


This ABSOLUTE PERFECTION to me!

One more tho'.....


...of course you know me well enough by now to know what I am think...what would it look like with centers in all my Rainbow solid colours...yup you got it!

I showed them to my friends to see if they liked the yellow center, as I was not sure it it was just too much. The white center is very classy I think. they thought that it tied in so well with the colours in rainbow Bright that it was a definate yes.

Thread amounts
Altin Basak 50(like 30) measures 8cm, whole motif Sh1 3m, Sh2 8.5m

Coats Floretta 20 measures 9cm, center Sh 1.25m, Ball 5.25m
outer round Sh1 3m, Sh2 4m

Coats mercer 20 measures 9cm, outer round Sh1 3.5m, SAh2 4.5m

Coats mercer 30 measures 8cm, center Sh 1.0m, Ball 4.75m
Outer round Sh1 2.10m, Sh2 4.25m

That should keep you going! Now I know that there will be some tatters out there who think that it is OK to look at my tatting and figure out the stitch count so that they can tat it themselves. This NOT my intention and I thoroughly disapprove of this. It is not the way to encourage designers to keep designing for us. This book is such good value that the author deserves your support for all her hard work.

If you like the designs, please buy the book, no I don't have any connection with the author or publisher, I just like fair play.

See ya tomorrow!! or will I!

One last image before I go...

Wednesday, December 02, 2009

Second Day Of December!

I am spurred on by your enthusiasm!

I am still working on 24 snowflakes in tatting by Lene Bjorn.

So I present to you the Second day of December snowflake .
I had and still have great ideas for this one as it is a very simple pretty design.
I tatted it in two rounds...but I could have used a split chain to go from round one to round two.

First in Floretta 20 in that gorgeous deep pinks mix.


I really like this one, I also like the ones that Diane tatted. Steph has also been tatting from this book. she has done Dec 1st and may be going to join me in this challenge!

Next I tatted it in traditional white. At one time all my snowflakes were white and they still look stunning in white....but nowadays white has become raw HDT and is crying out to be dyed!!
It reminds me of when I first met hubby, he seemed to live on toast and bread became known as raw toast!


Now if I only tatted one of each snowflake I would get through the challenge a lot quicker.....can I do that!!....and so I am abandoning my ideas for this flake...at the moment.

Thread amounts Floretta..it measures 4inches,
Round 1 Sh 1.75m, ball 1.4m
Round 2 Sh 6.5m, ball 3.5m.....maybe I should make bigger picots...I do try!

Coats Artist 20, ...it measures very slightly more than the Floretta
Round 1 Sh 2.15m, ball 1.80m
Round 2 Sh 7.5m, ball 4.0m

That's all..see you tomorrow...with a bit of luck!

Tuesday, December 01, 2009

Snowflake time again!

This year I have given myself another challenge!!!
To tat every snowflake in Lene Bjorn's book 24 Snowflakes in tatting.


I bought this book before last Christmas and just looked at it. It's a great little book, for a very small outlay you get 24 great designs....not a lot of instruction so you need to be confident just tatting from diagrams.

The other bit to my challenge is to tat them in order...not just pick out the ones that I like best...give them all a chance to shine!

Now note this well... I didn't give myself a deadline!!!! so it may take several Christmasses!!!

As it's December the 1st today ( and I am going into Christmas panic...impossible at this late stage to make all my cards and gifts and get them in the post in time)...it is a good idea to start showing my progress.

I started with Altin Basak a 3 ply soft thread that is a ... to unpick. This is a very pretty delicate colourway.


Several others have said that this is the one design that nobody wants to tat...and they are right...those little lengths of thread between the rings are a pain. But trying to get it right is great practice.

So I made it again in White, 'cos I love snowflakes in white....almost as much as I now love them in colour!!


It actually looks better in this scan than it does in real life as it is in size 20 and is too big. 4.5inches at it's widest point.

The next one , yup there is another one...is in Floretta 20 in a rich pink varig', slightly smaller than the Coats 20.


Now isn't this getting more exciting as I get a feel for this pattern???? Not sure that the varigation shows up the design best.

But i can't resist one final tat in my favourite thread of all time...you guessed it Rainbow Bright. Coats 30, add some beads and let's see what that looks like.


Now this in yer face conglomeration of colours really works for me in this design. What do you think...all comments welcome...I need your input to this blog.

Thread amounts
Coats 20 Sh1 13.5m, Sh2 75cm...
Coats 30 Sh1 11.75m and 18 beads, Sh2 70cm...
Floretta 20 Sh1 11m, Sh 2 60cm.

Don't forget that you may need more, especially if you make longer picots.

One last look at them all to compare the sizes.


See ya tomorrow...if I get it finished!!!

Wednesday, November 25, 2009

My stash and my sweetheart!

IsDihara asked us What's in your stash? of HDT...we addicts know exactly what that means!

Now I dye my own thread so you wouldn't expect me to have a stash....except the enormous stash of my own threads, favourites and lots of trials.......but I do have and it's getting bigger.

Dyeing takes such a long time (my way anyway!)that I just can't dye all the colour combos that are spinning around in my head. I have tried to develop my own style of dyed thread and not copy anyone else.....so that leaves me free.......TO BUY and not feel guilty!!

Here then is my stash....


....I do use it...honest....there are some bits left on card....but mainly I just take it out and adore the wonderful colours.....making the great mistake of saving it for something special!!

IsDihara has been tatting with my Rainbow Bright thread. She posted a long time ago a picture of Birgit Phelps Sweetheart design....


...she needed extra thread to complete an idea she had to add more rounds to this pattern.....well she has finished it and posted about it today...


...isn't that just stunning?

She set me off wanting to tat that pattern...so I did...months ago...didn't get round to posting it.

First in a boring pale pink Flora 20....with a spiral tail ending in a trefoil...


...then in Altin Basak exactly the same as Birgit used....with a lock stitch chain tail ending in split rings...


...and finally in my Raspberry Sorbet in size 20 Coats Mercer


...I actually like this one the best because the subtle varigation does not overpower the design as with the Altin Basak.

It's a pretty easy pattern to tat once you get the hang of what joins to what.
In Flora 20 it took a total of 5m, 3.5m on the shuttle and 1.5m on the ball. It measures 6cm, (2.25in) across. add about 1m on two shuttles to make the tail.
Altin basak would take slightly less. It measures 5cm across.

Monday, November 23, 2009

Fun Day!

The fun day was.....FUN!

I wonder if it could possibly have anything to do with AGE.....and a decided lack of enthusiasm for standing in a field all day queuing up to do the different activities. There are never enough to occupy us all of the time,.....maybe it had something to do with November and rain....which gradually seeps into your bones!!

I just don't know!!

We had the use of our Community Hall and the Youth Club leader very kindly said that we could use their new hall as well.

In true Girl Guide fashion we left the place as we found it. The organisation was superb...all the children were checked in by their parents on arrival and checked out before they left. All coats and bags went into gigantic plastic sacks...It's the first time ever that we haven't had belongings left behind.


I promised to show you the turkeys made from tights....


...some of them look pretty scary...some of them look just plain scared!!.....

....there were more but these were the cutest!

This day was also great because there were only ourselves and the other town in our District....2 Brownie packs, 2 Ladybird groups and 2 lots of Guides plus Ranger Guides.
About 90 youngsters and 22 Leaders/Rangers....manageable.
At some regional fundays we might get 600 children!!
This is just half of the hall!


We started our craft challenges by making Friendship Sticks...


The theme for the day was Thanksgiving so every activity (almost) had some tenuous American association and each was explained to them.
The Friendship sticks they were to decorate and then swap at the end of the day.
They had to include 3 spots, red green and yellow like traffic lights.
Let me explain the thinking.

When the first settlers left for America there was great danger and difficulties on the way....red....they had to STOP and think.....
AS they overcame these difficulties they got the all clear...green...GO....
When all was well the sun came out....yellow...for Sunny Brownies.

they liked this...but we had to string it out a bit....before we could move on.
These are their sticks...


...who thought up all this....well not me this time!

On to making head dresses to remember the native Americans who already lived there.

Feathers, beads, corrugated paper (colour coded for each group!), staples and string!


Next the ages and groups were mixed up and we had to do 10 out of 16 challenges...vaguely related to America...we threw the turkeys thro hoops into a bucket, dressed up and were pulled in a box across the ocean, were pulled on a skateboard across the ocean, crawled thro tunnels, made stick men, threw wet sponges at photos of....and stuff. Plenty to keep us occupied in our 5 mins allowed.


Then it was snacks and drinks, followed by a fabulous campfire....a large foil tray filled with night lights...and the lights out.


We sang and we wiggled and jiggled until it was time to go home, swapped sticks.....sang our closing songs....

.....a big tidy up and we all agreed that it was the best ever and we should do it again.....and it was only a 10 minute drive home!!!!

.........HAPPY THANKSGIVING EVERYONE!.....

Sunday, November 22, 2009

Update on life!

I have had so many uplifting things said about my trees and my pots, that I am beginning to rethink the purpose of blogging.

I think that it is a celebration of our lives, the things we did in the past an the things we do now...and encouragement for things we will do in the future.

Maybe you would like to see more of the stuff that I made in my pottery class???

The weather continues to be atrocious. Today is the day we had planned our district fun day for the Ladybirds, Brownies and Guides. We had a Scout campsite booked and so much planned. But it's not a good time to be thinking of travelling so it has been transferred to our Community hall where we hold our meetings. I have to raise my enthusiasm to go!

The theme is thanksgiving and all things American, they will make headdresses and bracelets, bookmarks whatever we can think of. We have all been making turkeys for a 'throw the turkey game'.
Our turkeys made by the brownies from stuffed tights are fabulous...must take a photo to show you.

Our beautiful city is still awash, not sure if the water has gone down yet as there is more and more rain adding to it. Ever since the dam released 535 tonnes of water per second on thursday night the situation has been dire. One of the main shopping street was under 5 feet of water, underground garages, the basement cafe in out new state of the art, art gallery on the university campus, hotels, shops...all swamped. The damage is estimated at 100 million euro.
I have been watching lots of U tube videos..even one on urban skim boarding down city streets. That's a new one!
The whole of the city center and a lot of surrounding districts are without drinking water, due to a major problem with a pump.

So many other small towns all built by rivers are also flooded....so many roads impassable...the worst flooding ever.

Gosh am I glad I live on a hill!

Before and during all this foul weather we have been upgrading our own flood defence!

The house behind us is further up the hill and with the new deluges of torrential rain...it pours down their driveway in a torrent...across the drain that they put in , across the road and down our driveway. Our temporary barrier, drain and soak away all helped. Now we have a full barrier to send the water on it's way past us....to somewhere else!....and a beautiful new Donegal stone crazy paved driveway..that slopes every which way to ensure the water runs off into the new drains...and not into our house and garage.

Friday, November 20, 2009

My potting experiments!

It's stopped raining for today at least, the sun shone and the sky was blue. Moved all the trees to a sheltered place...but can't keep an eye on them anymore.

Ireland is saturated, the ground can't take any more rain. Today the City is flooded,even a city hospital. The Uni has cancelled lectures as the approach road and some buildings are flooded. In the night the electricity board had to open the dam flood gates and release some water, coincided with the high tide and the river overflowed.
A dreadful weekend is forecast, we were to take the Brownies for a fun day to a Scout campsite, thankfully it has been transferred to out community hall.

I know I had you worried yesterday that all my pots had broken!!
Had me worried too! Broken pot count is up to 6 but can't find a single broken twig.

Your comments cheered me up so much. Oh LadyShuttlemaker, how I would love to have a pot made by you...no that's not a hint...don't even think about it.

Today I thought that I would show you some of the pots that I made myself...way back when.

I went to evening class at a secondary school....the teacher made the mistake of letting me take home wadges of clay to 'play' with and she even fired all that I made...think she was proud of me!

One of the things I most wanted to make was Bonsai bowls. Mostly they were hand built with coils and slabs but on my second course I got to use the wheel...not very sucessfully but I did make enough to please me......well not nearly enough..I would have loved to have my own kiln...but ended up with a tiny enammeling kiln instead and that shut me up!

Here goes... these photos all date back to 2000 so if the trees in them have survived they look quite different today..better usually!!

This is my absolute favourite, thrown on the wheel, its tiny (about 4 inches)and has a tiny elm in it..grown from a seed...I can remember the exact tree in Italy...this pot survived the crash..unfortunately the tree I think was already defunct!


....this was made from coils and decorative lumps of clay and is much bigger...about 6 inches. This is a dwarf arctic birch. The pot was stored in my stash so survives.


...this is a rather wonky slab built pot, contains a Buxus (box), also in storage..a survivor. about 7inches.


This is another coil built pot, not a good idea to make a bowl narrower at the top than the middle. This one succumbed to frost a couple of years ago.....it contains a Cotoneaster...dug up from the garden. About 5 inches.


This is another slab built pot, not very strong was smashed to smitherines yesterday a tiny 4in it contains Fuchsia molinia.


This was a pretty decent coil built pot, had an ash tee from the garden in it, now in storage.


Another slab built pot about 7 inches, contains a holly seedling from the garden, pot also in storage.


That was probably the best thrown pot that I achieved, even with decorative ridges, made by cutting notches in an old credit card!

Would have been too thick for tableware but perfect for my purpose, about 6 inches, also in store. Here it contained a blackthorn seedling Prunus spinosa.


AND this is only the tree pot part of what I made in my classes!

Thursday, November 19, 2009

Not my lucky day!

Remember I told you only yesterday, how atrocious our weather has been...and is!

Last night was awful....sheeting rain and blowing a gale....and it has continued all day with no let up.

Just before lunchtime while I was busy making leprechauns to placate Fergeal and listening to my iTunes....there must have been an enormous crash....as my display stand for my little trees collapsed!


Lets take a closer look....


........let's zoom in and see what's in there......see that very pale turquoisey blue pot....in the bottom left of the previous picture.....remember it.


These photos were taken through the window.....I was gutted.
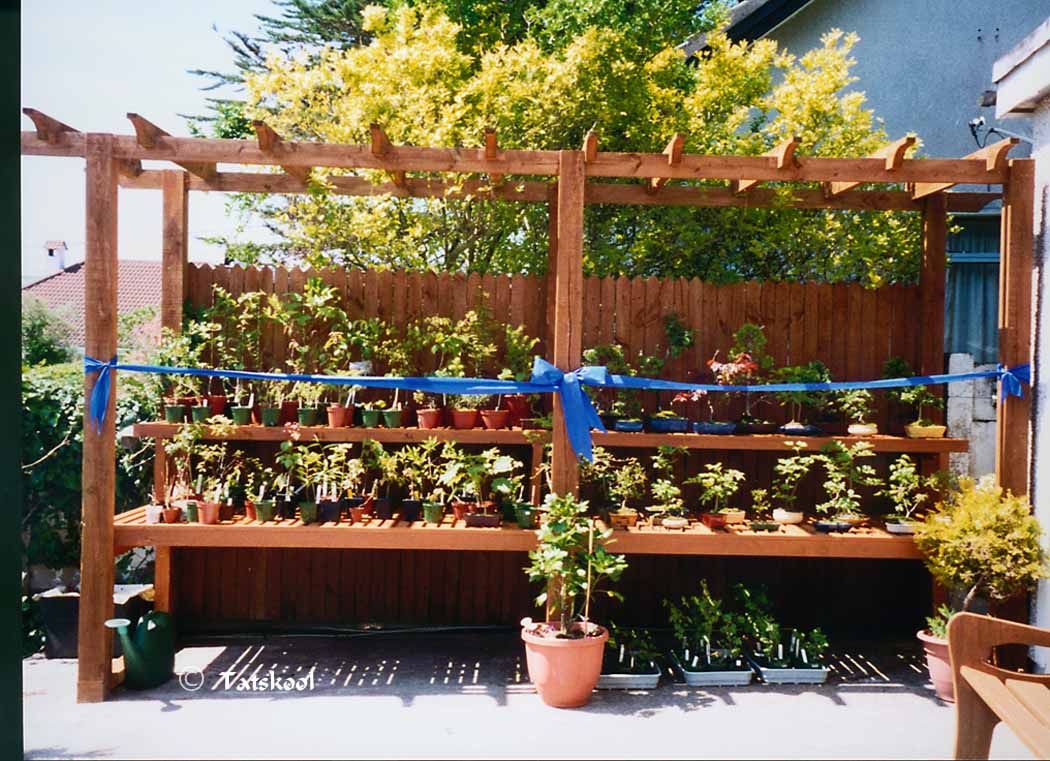
We had replaced all the slats on the tables only a year or so ago and had just decided that we needed to replace the whole frame. Trying to remember how long it was since hubby made it for me...I found my photos of it's official opening....


Gosh it was 1996.....that's 13 years ago.....unlucky or what!

I started keeping and training these little trees in 1990 after a friend gave us a bag of acorns!.......Great things from little acorns grow.
They are mostly from seedlings dug up from the garden....and from garden centers.......nothing of any value...except to me. In 1990 they were nearly all in flower pots they were so small and new. Anything that didn't move I dug up and put in a pot!

My stash of pots almost exceeds my thread stash! The trees that I favoured tended to get bigger over the years...mainly because they are easier to look after.

2002 and they were looking their best....before tatting and thread dyeing reared their ugly heads. I had been suffering from a very bad neck for several years which had put an end to my craft passion...so the little trees filled the craft gap.


OK see the pale turquoisey blue pot on the bottom table, isn't that stunning...at it's very best before my son forgot to water it while we were away one time and it lost a lot of it's branches.....


......here it is again in spring 2003 together with my apple (of Apple Blossom fame)and my Japanese maples.

Now can you imagine my horror when I saw what had happened!!!!!

We decided that it called for drastic measures and rescue before it got even worse.....so we donned our waterproofs......

....and look there it is ......in one piece...a miracle.


One by one they were taken out and handed to me...but that was the one sheltered spot in the garden! so now they face the wind and rain again.
OK I know it's not a real catastrophe but it felt like it to me!

You will be amazed to know that only about 5 pots got broken and all the trees look ok but time will tell.